LetsGrow.com Crop Registration app manual
Introduction
This manual provides comprehensive guidelines for conducting crop registration in tomato plants using the LetsGrow.com Registration App. Crop registration is a crucial step in effectively monitoring and managing the growth of tomato crops. The new LetsGrow.com app offers a user-friendly interface that allows you to visually register your tomato crop data while observing the plant. It is important to perform crop registration weekly, preferably on the same day and around the same time (e.g., every Thursday morning). Consistency is essential to maximize the value of your crop data.
Getting Started
Required materials:
- Caliper
- Marker
- Measuring tape
- Scale
- Labels
- Red tape
Set Up Your Registration Field
- Each greenhouse compartment should have a registration field. We recommend selecting at least 10 representative registration plants from your crop—this will be your registration plot. This number may be adjusted depending on the size of the greenhouse.
- Tip: The registration plot should be located in the middle of the greenhouse and not:
- Close to the greenhouse walls
- In a row with a greenhouse post
- Near the concrete walkway
- Mark the boundaries of your registration plot using red tape or colored ropes.
Steps for a Damaged Plant in the Registration Plot
- If a registration plant needs to be replaced (e.g., due to damage), choose a similar plant close to the registration plot.
- Find a cluster in a similar developmental stage and use the same labeling as the old plant. From then on, only register the new plant.
Optional: How to Register a Side Shoot
- When side shoots are retained on the plant, this increases stem density. New side shoots should be registered as a new location once the first truss begins to flower (after about 2–3 weeks). At this point, stem density in the app should also be adjusted accordingly.
- You can label side shoots with a different color or abbreviation (e.g., Plant 3, Plant 3s)
How to Label a New Truss
- Use labels for flowering stages from week one and add new labels weekly for each new truss. Start with “plant 1 truss 1,” and so on. Indicate the plant number and truss number, counted from bottom to top of the plant (e.g., 1 (10), 1s (10)).
- When adding a side shoot, use clear labels such as 1.1 or 1-s, or use a different label color to distinguish from main stems. Count trusses on side shoots using the same system. The first truss on the side shoot becomes (1).
Setting Up the LetsGrow.com Crop Registration App
Step 1: Download and Install the App
- Go to your device’s app store (App Store for iOS, Google Play Store for Android, or Microsoft Store for PC).
- Search for “LetsGrow.com Crop Registration app” and download/install the app.
Step 2: Log In or Sign Up
- Open the app.
- If you already have a LetsGrow.com account, enter your credentials and click “Log In.”
- Otherwise, create an account at https://www.letsgrow.com/login/
Step 3: Choose Your Variety
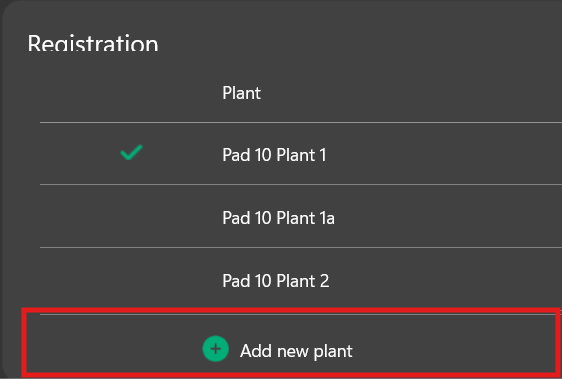
Step 4: Create Your Registration Plants
Step 5: Start Measuring
Registration
Plant Information
Measurements are taken weekly for each plant.
Head Thickness (mm)
Growth Length (cm)
For the first measurement at the start of the cycle, measure the total plant length from bottom to top.
In following weeks, hold the top of the plant against the string and mark the highest point. The growth is the distance between last week’s and this week’s marks.
Flowering Height (cm)
Leaf Length and Width
-
Leaf length = from stem to tip
-
Leaf width = widest point from left to right
Number of Leaves
-
Visual Method: Add new leaves manually, remove old ones weekly.
-
Counting Method: Count all leaves from the first one below last week’s mark down to the lowest leaf.
[Optional] Internodal Length
Measure the distance from the highest truss to the second highest, then divide by the number of leaf nodes in between.
Truss Information
Measurements are taken weekly for each plant.
Add a Truss or Leaf
- Click the plus icon next to the plant to add.
- Trusses and leaves are counted automatically when added.
Add a Side Shoot
- First add a leaf, then the plus icon allows side shoot addition.
- A green arrow indicates a new side shoot (i.e., new location/plant) has been added.
Truss Data Display
Icons and Meanings:
Closed flower – Petals still closed
Open flower – Petals wide open, stamens visible
Set flower – Petals wilted, crown bulging
Breaker stage – Fruit starting to change from green to orange
Harvested – Fruits or trusses harvested
-
The week after harvest, the truss is greyed out and cannot be edited.
-
Abortion – Open

Abortion – Set

Handling Error

Optional: Measuring the Growth of a Side Shoot
Length and Growth
Number of Leaves
Measurement After Topping
-
Stop measuring the head thickness.
-
Continue measuring leaf length and leaf width for one more week.
-
Continue measuring the number of flowering and developing trusses for two more weeks.
-
All other measurements continue as usual.
Multimedia
-
Taking a new photo
-
Selecting a previously taken photo
-
Recording a new video
-
Selecting a previously recorded video
General Information
-
Fruit weight – g
-
Harvest – kg
-
Leaf area index – %
-
Stem density – #/m²
-
Pruning policy – fruits/truss
-
Area – m²
-
Brix value – °
Fruit Weight / Truss Weight – g
Harvest – kg
Leaf Area Index – %
The leaf area index is a calibration factor used to estimate the total leaf surface of the crop based on sample leaves. This factor is determined by statistically calculating a correlation factor from measured leaf areas.
Measurement:
Consult your breeder or propagator for guidance in obtaining or calculating the leaf area index. Various tools can be used for accurate measurement, such as:
http://www.leafscanapp.com/ – usable with your smartphone.
Examples of leaf area indices – %:
- Tomato 'Merlice': 29%
-
Tomato 'Dunk': 24%
-
Tomato 'Pom Sweet Candy': 22%
-
Tomato 'Caramelino': 26%
-
Tomato 'Daltari': 25%
Stem Density – #/m²
-
Side shoots are added once the first flower appears on the lateral shoot.
-
The number of heads per m² is reduced.
Area – m²
-
Harvest – kg refers to the total weight of tomatoes harvested from the registration field. In this case, enter the area (m²) of the registration field.
-
Harvest – kg refers to the total weight of tomatoes harvested from the entire greenhouse. In this case, enter the area (m²) of the entire greenhouse.
Submit Data
Before submitting your crop registration, you can review the plant information overview to correct any errors. Once everything is checked, you can submit the data.
Settings
Modify Multiple Items
Settings → Modify multiple items
Start a New Crop Cycle
Boundaries
Language
Theme
In the theme settings, you can choose between dark and light mode. Dark mode is set by default.
Refresh Varieties and Items
Only refresh when there are changes to your varieties/items to ensure proper synchronization.
Tablet Specifications for Optimal App Performance
The Android version of a tablet mainly determines whether the app can be installed and whether the operating system is up to date.
Our app supports Android 11 and higher.
Note: If the app is slow or crashes frequently, this is usually due to the tablet’s hardware (such as memory or processing power), not the Android version.
Recommended specifications for optimal performance:
Recommended:
-
At least 8 GB RAM
-
At least 128 GB storage
-
Minimum requirements for reasonable performance:
-
Between 4 GB and 6 GB RAM
-
At least 64 GB storage
-
For the best user experience, we recommend using a tablet that meets the recommended specifications.